Amazon S3 Sink Connector for Confluent Platform
The Kafka Connect Amazon S3 sink connector exports data from Apache Kafka® topics to
S3 objects in either Avro, JSON, or Bytes formats. Depending on your
environment, the S3 connector can export data by guaranteeing exactly-once
delivery semantics to consumers of the S3 objects it produces.
The Amazon S3 sink connector periodically polls data from Kafka and in turn
uploads it to S3. A partitioner is used to split the data of every Kafka
partition into chunks. Each chunk of data is represented as an S3 object. The
key name encodes the topic, the Kafka partition, and the start offset of this
data chunk. If no partitioner is specified in the configuration, the default
partitioner which preserves Kafka partitioning is used. The size of each data
chunk is determined by the number of records written to S3 and by schema
compatibility.
Features
The Kafka Connect Amazon S3 Sink connector for Confluent Platform offers a variety of features:
- Exactly Once Delivery: Records that are exported using a deterministic
partitioner are delivered with exactly-once semantics regardless of the
eventual consistency of S3.
- Pluggable Data Format with or without Schema: Out of the box, the
connector supports writing data to S3 in Avro and JSON format. Besides records
with schema, the connector supports exporting plain JSON records without
schema in text files, one record per-line. In general, the connector may
accept any format that provides an implementation of the
Format interface.
- Pluggable Partitioner: The connector comes out of the box with
partitioners that support default partitioning based on Kafka partitions, field
partitioning, and time-based partitioning in days or hours. You may implement
your own partitioners by extending the
Partitioner class. Additionally,
you can customize time based partitioning by extending the
TimeBasedPartitioner class.
- Non-AWS Object Storage Support: AWS S3 is an industry-standard object
storage service. You can use the Kafka Connect S3 connector to connect object
storage storage on non-AWS cloud platforms. For more information, see
Using Non-AWS Storage Providers.
- Schema Evolution: Schema evolution only works if the records are generated with the default naming strategy, which is
TopicNameStrategy. An error may occur if other naming strategies are used. This is because records are not compatible with each other. schema.compatibility should be set to NONE if other naming strategies are used. This may result in small object files because the sink connector creates a new file every time the schema ID changes between records. See Subject Name Strategy for more information about naming strategies.
Caution
You can’t mix schema and schemaless records in storage using
kafka-connect-storage-common. Attempting
this causes a runtime exception. If you are using the self-managed <supported.html> version of this connector, this issue will be
evident when you review the log files (only
available for the self-managed connector).
Install the Amazon S3 Sink Connector
You can install this connector by using the instructions or you can
manually download the ZIP file.
Install the connector using Confluent Hub
- Prerequisite
- Confluent Hub Client must be installed. This is installed by default with Confluent Enterprise.
Navigate to your Confluent Platform installation directory and run the following command to install the latest (latest) connector version. The connector must be installed on every machine where Connect will run.
confluent-hub install confluentinc/kafka-connect-s3:latest
You can install a specific version by replacing latest with a version number. For example:
confluent-hub install confluentinc/kafka-connect-s3:10.0.0
Streaming ETL Demo
To evaluate the Kafka Connect Kinesis source connector, AWS S3 sink connector, Azure Blob sink connector, and GCP GCS sink connector in an end-to-end streaming deployment, refer to the Cloud ETL demo on GitHub. This demo also allows you to evaluate the real-time data processing capabilities of ksqlDB.
Mapping Records to S3 Objects
The Amazon S3 Sink connector consumes records from the specified topics,
organizes them into different partitions, writes batches of records in each
partition to a file, and then uploads those files to the S3 bucket. It uses S3
object paths that include the Kafka topic and partition, the computed partition,
and the filename. The S3 connector offers several ways to customize this
behavior, including:
S3 Object Names
The S3 data model is a flat structure: each bucket stores objects, and the name
of each S3 object serves as the unique key. However, a logical hierarchy can be
inferred when the S3 object names uses directory delimiters, such as /. The
S3 connector allows you to customize the names of the S3 objects it uploads to
the S3 bucket.
In general, the names of the S3 object uploaded by the S3 connector follow this
format:
<prefix>/<topic>/<encodedPartition>/<topic>+<kafkaPartition>+<startOffset>.<format>
where:
<prefix> is specified with the connector’s topics.dir configuration
property, which defaults to the literal value topics and helps create
uniquely name S3 objects that don’t clash with existing S3 objects in the same
bucket.<topic> corresponds to the name of the Kafka topic from which the records
in this S3 object were read.<encodedPartition> is generated by the S3 connector’s partitioner (see
Partitioning Records into S3 Objects).<kafkaPartition> is the Kafka partition number from which the records in
this S3 object were read.<startOffset> is the Kafka offset of the first record written to this S3
object.<format> is the extension identifing the format in which the records are
serialized in this S3 object.
If desired, the / and + characters can be changed using the connector’s
directory.delim and file.delim configuration properties.
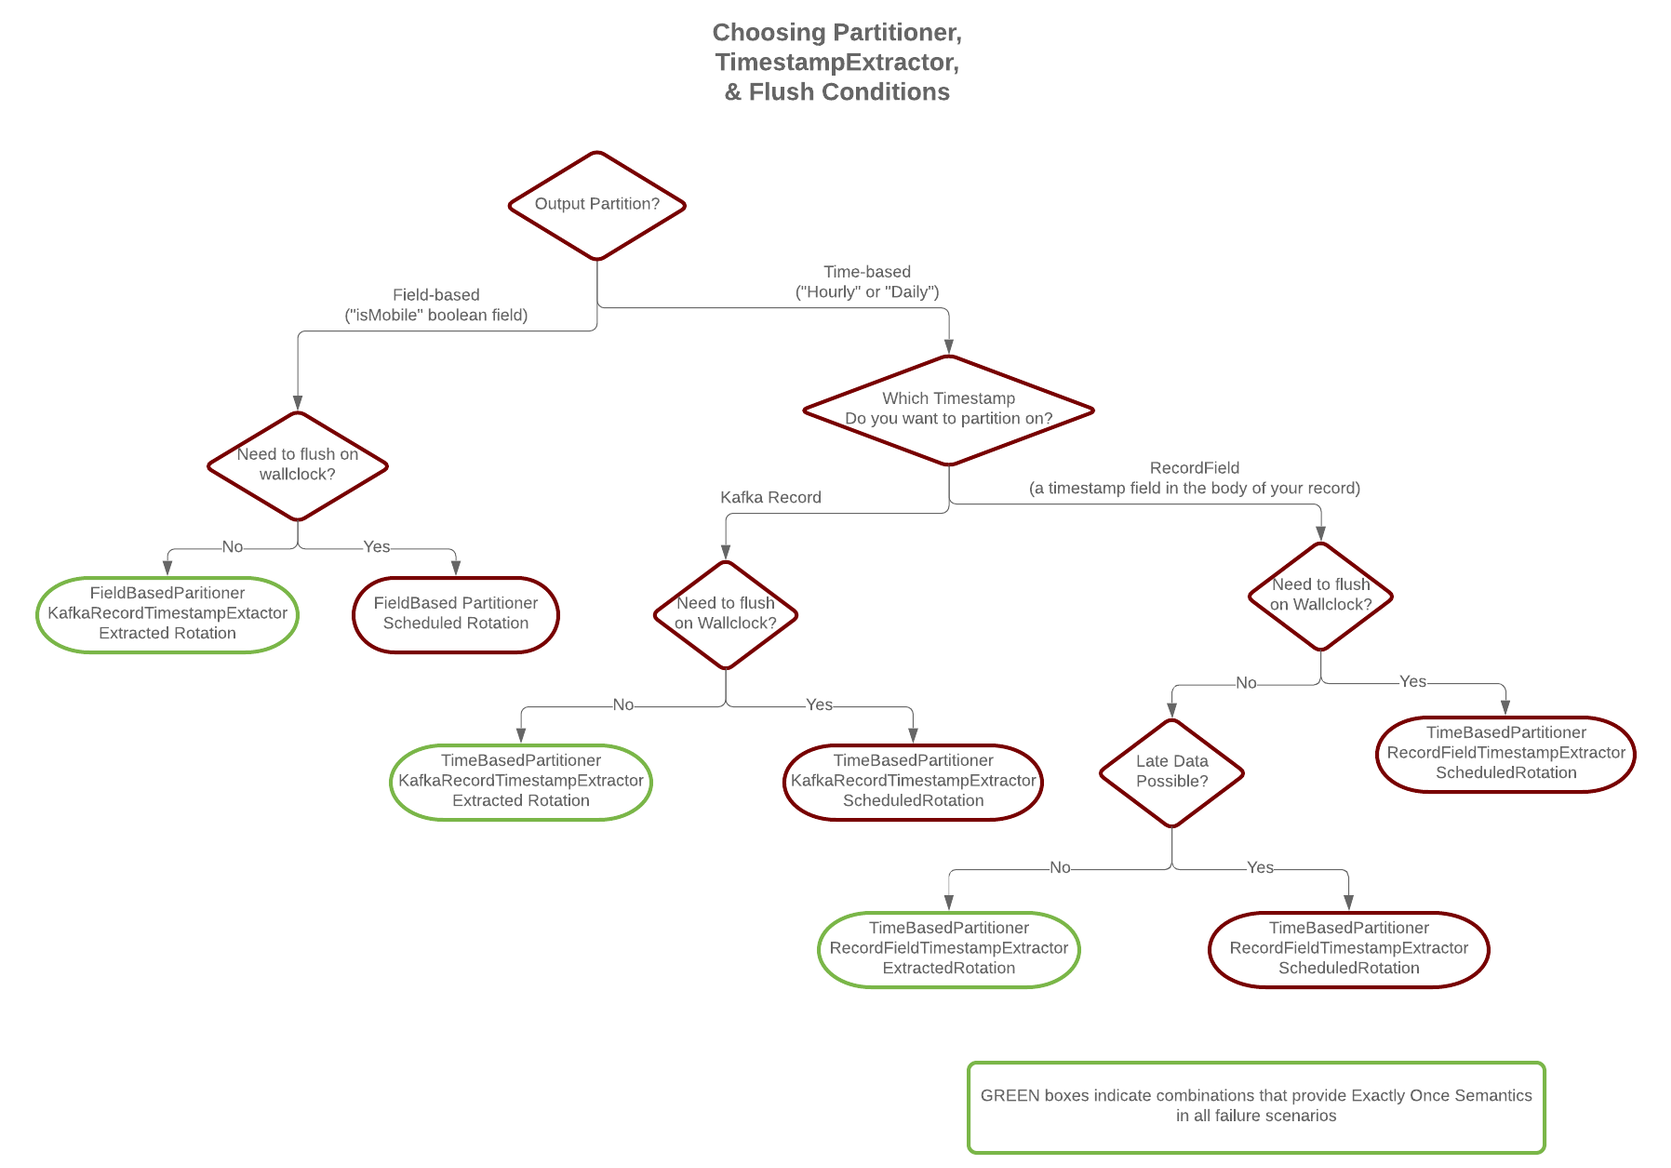
Partitioning Records into S3 Objects
The S3 connector’s partitioner determines how records read from a Kafka topic
are partitioned into S3 objects. The partitioner determines the
<encodedPartition> portion of the S3 object names (see
S3 Object Names).
The partitioner is specified in the connector configuration with the
partitioner.class configuration property. The S3 connector comes with the
following partitioners:
- Default (|ak|) Partitioner: The
io.confluent.connect.storage.partitioner.DefaultPartitioner
preserves the same topic partitions as in Kafka, and records from each topic
partition ultimately end up in S3 objects with names that include the Kafka
topic and Kafka partitions. The <encodedPartition> is always
<topicName>/partition=<kafkaPartition>, resulting in S3 object names of
the form
<prefix>/<topic>/partition=<kafkaPartition>/<topic>+<kafkaPartition>+<startOffset>.<format>.
- Field Partitioner: The
io.confluent.connect.storage.partitioner.FieldPartitioner determines the
partition from the field within each each record identified by the connector’s
partition.field.name configuration property, which has no default. This
partitioner requires STRUCT record type values. The <encodedPartition>
is always <topicName>/<fieldName>=<fieldValue>, resulting in S3 object
names of the form
<prefix>/<topic>/<fieldName>=<fieldValue>/<topic>+<kafkaPartition>+<startOffset>.<format>.
- Time Based Partitioner: The
io.confluent.connect.storage.partitioner.TimeBasedPartitioner
determines the partition from the year, month, day, hour, minutes, and/or seconds.
This partitioner requires the following connector configuration properties:
- The
path.format configuration property specifies the pattern used for
the <encodedPartition> portion of the S3 object name. For example, when
path.format='year'=YYYY/'month'=MM/'day'=dd/'hour'=HH, S3 object names
will have the form
<prefix>/<topic>/year=YYYY/month=MM/day=dd/hour=HH/<topic>+<kafkaPartition>+<startOffset>.<format>.
- The
partition.duration.ms configuration property defines the maximum
granularity of the S3 objects within a single encoded partition directory.
For example, setting partition.duration.ms=600000 (10 minutes) will
result in each S3 object in that directory having no more than 10 minutes of
records.
- The
locale configuration property specifies the JDK’s locale used for
formatting dates and times. For example, use en-US for US English,
en-GB for UK English, fr-FR for French (in France). These may vary
by Java version; see the available locales.
- The
timezone configuration property specifies the current timezone in
which the dates and times will be treated. Use standard short names for
timezones such as UTC or (without daylight savings) PST, EST,
and ECT, or longer standard names such as America/Los_Angeles,
America/New_York, and Europe/Paris. These may vary by Java version;
see the available timezones within each locale, such as those within the “en_US”
locale.
- The
timestamp.extractor configuration property determines how to obtain
a timestamp from each record. Values can include Wallclock (the default)
to use the system time when the record is processed, Record to use the
timestamp of the Kafka record denoting when it was produced or stored by the
broker, RecordField to extract the timestamp from one of the fields in
the record’s value as specified by the timestamp.field configuration
property.
- Daily Partitioner: The
io.confluent.connect.storage.partitioner.DailyPartitioner is equivalent to
the TimeBasedPartitioner with path.format='year'=YYYY/'month'=MM/'day'=dd
and partition.duration.ms=86400000 (one day, for one S3 object in each
daily directory). This partitioner always results in S3 object names of the
form
<prefix>/<topic>/year=YYYY/month=MM/day=dd/<topic>+<kafkaPartition>+<startOffset>.<format>.
This partitioner requires the following connector configuration properties:
- The
locale configuration property specifies the JDK’s locale used for
formatting dates and times. For example, use en-US for US English,
en-GB for UK English, fr-FR for French (in France). These may vary
by Java version; see the available locales.
- The
timezone configuration property specifies the current timezone in
which the dates and times will be treated. Use standard short names for
timezones such as UTC or (without daylight savings) PST, EST,
and ECT, or longer standard names such as America/Los_Angeles,
America/New_York, and Europe/Paris. These may vary by Java version;
see the available timezones within each locale, such as those within the “en_US”
locale.
- The
timestamp.extractor configuration property determines how to obtain
a timestamp from each record. Values can include Wallclock (the default)
to use the system time when the record is processed, Record to use the
timestamp of the Kafka record denoting when it was produced or stored by the
broker, RecordField to extract the timestamp from one of the fields in
the record’s value as specified by the timestamp.field configuration
property.
- Hourly Partitioner: The
io.confluent.connect.storage.partitioner.HourlyPartitioner is equivalent to
the TimeBasedPartitioner with path.format='year'=YYYY/'month'=MM/'day'=dd/'hour'=HH and
partition.duration.ms=3600000 (one hour, for one S3 object in each hourly
directory). This partitioner always results in S3 object names of the form
<prefix>/<topic>/year=YYYY/month=MM/day=dd/hour=HH/<topic>+<kafkaPartition>+<startOffset>.<format>.
This partitioner requires the following connector configuration properties:
- The
locale configuration property specifies the JDK’s locale used for formatting dates and times.
For example, use en-US for US English, en-GB for UK English, fr-FR for French (in France).
These may vary by Java version; see the available locales.
- The
timezone configuration property specifies the current timezone in which the dates and times will be treated.
Use standard short names for timezones such as UTC or (without daylight savings) PST, EST, and ECT,
or longer standard names such as America/Los_Angeles, America/New_York, and Europe/Paris.
These may vary by Java version; see the available timezones within each locale,
such as those within the “en_US” locale.
- The
timestamp.extractor configuration property determines how to obtain a timestamp from each record.
Values can include Wallclock (the default) to use the system time when the record is processed,
Record to use the timestamp of the Kafka record denoting when it was produced or stored by the broker,
RecordField to extract the timestamp from one of the fields in the record’s value
as specified by the timestamp.field configuration property.
As noted below, the choice of timestamp.extractor affects whether the S3
connector can support exactly once delivery.
You can also choose to use a custom partitioner by implementing the
io.confluent.connect.storage.partitioner.Partitioner interface, packaging
your implementation into a JAR file, and then:
- Place the JAR file into the
share/java/kafka-connect-s3 directory of your Confluent Platform installation
on each worker node.
- Restart all of the Connect worker nodes.
- Configure S3 connectors to use your fully-qualified partitioner class name.
S3 Object Uploads
As the S3 connector processes each record, it uses the partitioner to determine
into which encoded partition that record should be written. This continues for
each partition until the connector determines that a partition has enough
records and should be uploaded to the S3 bucket using the S3 object name for
that partition. This technique of knowing when to flush a partition file and
upload it to S3 is called the rotation strategy,
and there are a number of ways to control this behavior:
Maximum number of records: The connector’s flush.size configuration
property specifies the maximum number of records that should be written to a
single S3 object. There is no default for this setting.
Maximum span of record time: The connector’s rotate.interval.ms
specifies the maximum timespan in milliseconds a file can remain open and
ready for additional records. The timestamp for each file starts with the
record timestamp of the first record written to the file, as determined by
the partitioner’s timestamp.extractor. As long as the next record’s
timestamp fits within the timespan specified by the rotate.interval.ms,
the record will be written to the file. If a record’s timestamp does not fit
within the timespan of the file, the connector will flush the file, uploaded
it to S3, commit the offsets of the records in that file, and then create a
new file with a timespan that starts with the first record and writes the
first record to the file.
Scheduled rotation: The connector’s rotate.schedule.interval.ms
specifies the maximum timespan in milliseconds a file can remain open and
ready for additional records. Unlike with rotate.interval.ms, with
scheduled rotation the timestamp for each file starts with the system time
that the first record is written to the file. As long as a record is processed
within the timespan specified by rotate.schedule.interval.ms, the record
will be written to the file. As soon as a record is processed after the
timespan for the current file, the file is flushed, uploaded to S3, and the
offset of the records in the file are committed. A new file is created with a
timespan that starts with the current system time, and the record is written
to the file. The commit will be performed at the scheduled time, regardless of
the previous commit time or number of messages. This configuration is useful
when you have to commit your data based on current server time, for example at
the beginning of every hour. The default value -1 means that this feature
is disabled.
Important
Be sure to set the timezone configuration property before setting
rotate.schedule.interval.ms, otherwise the connector will throw an
exception.
These strategies can be combined as needed, and rotation occurs whenever any of
the strategies signals a rotation.
The first strategy will cause a rotation as soon as enough records have been
written to the file, and can be calculated after each record has been written
to the file. In other words, the file can be closed and uploaded to S3 as soon
as it is full.
When using rotate.interval.ms, the connector only closes and uploads a file
to S3 when the next file does not belong based upon that record’s timestamp. In
other words, if the connector has no more records to process, the connector may
keep the file open until the connector can process another record (this can be a
long time).
Scheduled rotation uses rotate.schedule.interval.ms to close the file and
upload to S3 on a regular basis using the current time, rather than the record
time. Even if the connector has no more records to process, Connect will
still call the connector at least every offset.flush.interval.ms as defined
in the Connect worker’s configuration file. And every time this occurs, the
connector uses the current time to determine if the currently opened
file should be closed and uploaded to S3.
Note
Not all rotation strategies are compatible with the S3 connector’s ability to
deliver S3 objects exactly once with eventual consistency. See the
Exactly Once section below for details.
The S3 object uploaded by the connector can be quite large, and the connector
supports using a multi-part upload mechanism. The s3.part.size configuration
property defaults to 26214400 bytes (25MB), and specifies the maximum size
of each S3 object part used to upload a single S3 object.
Additionally, the schema.compatibility setting (see Schema Evolution) will also affect when one file is closed and uploaded to
an S3 object. If a record cannot be written to one file because its schema has
changed relative to the records already in the file, the connector will rotate
by closing the file, uploading it to S3, committing offsets for the records in
the file, creating a new file and writing the new record.
Exactly-once delivery on top of eventual consistency
The S3 connector is able to provide exactly-once semantics to consumers of the
objects it exports to S3, under the condition that the connector is supplied
with a deterministic partitioner.
Currently, out of the available partitioners, the default and field partitioners
are always deterministic. TimeBasedPartitioner can be deterministic with
some configurations, discussed below. This implies that, when any of these
partitioners is used, splitting of files always happens at the same offsets for
a given set of Kafka records. These partitioners take into account
flush.size and schema.compatibility to decide when to roll and save a
new file to S3. The connector always delivers files in S3 that contain the same
records, even under the presence of failures. If a connector task fails before
an upload completes, the file does not become visible to S3. If, on the other
hand, a failure occurs after the upload has completed but before the
corresponding offset is committed to Kafka by the connector, then a re-upload
will take place. However, such a re-upload is transparent to the user of the S3
bucket, who at any time will have access to the same records made eventually
available by successful uploads to S3.
To guarantee exactly-once semantics with the TimeBasedPartitioner, the
connector must be configured to use a deterministic implementation of
TimestampExtractor and a deterministic rotation strategy. The deterministic
timestamp extractors are Kafka records (timestamp.extractor=Record) or
record fields (timestamp.extractor=RecordField). The deterministic rotation
strategy configuration is rotate.interval.ms (setting
rotate.schedule.interval.ms is nondeterministic and will invalidate
exactly-once guarantees).
Schema Evolution
Important
Schema evolution only works if the records are generated with the default
naming strategy, which is TopicNameStrategy. An error may occur if other
naming strategies are used. This is because records are not compatible with
each other. schema.compatibility should be set to NONE if other
naming strategies are used. This may result in small object files because the
sink connector creates a new file every time the schema ID changes between
records. See Subject Name Strategy for more information
about naming strategies.
The S3 connector supports schema evolution and reacts to schema changes of data
according to the schema.compatibility configuration. In this section, we
will explain how the connector reacts to schema evolution under different values
of schema.compatibility. The schema.compatibility can be set to
NONE, BACKWARD, FORWARD and FULL, which means NO compatibility,
BACKWARD compatibility, FORWARD compatibility and FULL compatibility
respectively.
NO Compatibility: By default, the schema.compatibility is set to
NONE. In this case, the connector ensures that each file written to S3 has
the proper schema. When the connector observes a schema change in data, it
commits the current set of files for the affected topic partitions and writes
the data with new schema in new files.
BACKWARD Compatibility: If a schema is evolved in a backward compatible
way, we can always use the latest schema to query all the data uniformly. For
example, removing fields is backward compatible change to a schema, since when
we encounter records written with the old schema that contain these fields we
can just ignore them. Adding a field with a default value is also backward
compatible.
If BACKWARD is specified in the schema.compatibility, the connector
keeps track of the latest schema used in writing data to S3, and if a data
record with a schema version larger than current latest schema arrives, the
connector commits the current set of files and writes the data record with new
schema to new files. For data records arriving at a later time with schema of
an earlier version, the connector projects the data record to the latest
schema before writing to the same set of files in S3.
FORWARD Compatibility: If a schema is evolved in a forward compatible way,
we can always use the oldest schema to query all the data uniformly. Removing
a field that had a default value is forward compatible, since the old schema
will use the default value when the field is missing.
If FORWARD is specified in the schema.compatibility, the connector
projects the data to the oldest schema before writing to the same set of files
in S3.
FULL Compatibility: Full compatibility means that old data can be read
with the new schema and new data can also be read with the old schema.
If FULL is specified in the schema.compatibility, the connector
performs the same action as BACKWARD.
Schema evolution in the S3 connector works in the same way as in the HDFS
connector.
Automatic Retries
The S3 connector may experience problems writing to the S3 bucket, due to
network partitions, interruptions, or even AWS throttling limits. In many
cases, the connector will retry the request a number of times before failing. To
prevent from further overloading the network or S3 service, the connector uses
an exponential backoff technique to give the network and/or service time to
recover. The technique adds randomness, called jitter, to the calculated backoff
times to prevent a thundering herd, where large numbers of requests from many
tasks are submitted concurrently and overwhelm the service. Randomness spreads
out the retries from many tasks and should reduce the overall time required to
complete all outstanding requests compared to simple exponential backoff. The
goal is to spread out the requests to S3 as much as possible.
The maximum number of retry attempts is dictated by the s3.part.retries S3
connector configuration property, which defaults to three attempts. The delay
for retries is dependent upon the connector’s s3.retry.backoff.ms
configuration property, which defaults to 200 milliseconds. The actual delay is
randomized, but the maximum delay can be calculated as a function of the number
of retry attempts with ${s3.retry.backoff.ms} * 2 ^ (retry-1), where
retry is the number of attempts taken so far in the current iteration. In
order to keep the maximum delay within a reasonable duration, it is capped at 24
hours. For example, the following table shows the possible wait times
before submitting each of the three retry attempts.
Range of backoff times for each retry using the default configuration
| Retry |
Minimum Backoff (sec) |
Maximum Backoff (sec) |
Total Potential Delay from First Attempt (sec) |
|---|
| 1 |
0.0 |
0.2 |
0.2 |
| 2 |
0.0 |
0.4 |
0.6 |
| 3 |
0.0 |
0.8 |
1.4 |
Increasing the maximum number of retries adds more backoff:
Range of backoff times for additional retries
| Retry |
Minimum Backoff (sec) |
Maximum Backoff (sec) |
Total Potential Delay from First Attempt (sec) |
|---|
| 4 |
0.0 |
1.6 |
3.0 |
| 5 |
0.0 |
3.2 |
6.2 |
| 6 |
0.0 |
6.4 |
12.6 |
| 7 |
0.0 |
12.8 |
25.4 |
| 8 |
0.0 |
25.6 |
51.0 |
| 9 |
0.0 |
51.2 |
102.2 |
| 10 |
0.0 |
102.4 |
204.6 |
At some point, maximum backoff time will reach saturation and will be capped at
24 hours. From the example below, all attempts starting with 20 will have
maximum backoff time as 24 hours:
Range of backoff times when reaching the cap of 24 hours
| Retry |
Minimum Backoff (sec) |
Maximum Backoff (sec) |
Total Potential Delay from First Attempt (sec) |
|---|
| 15 |
0.0 |
3276.8 |
6553.4 |
| 16 |
0.0 |
6553.6 |
13107.0 |
| 17 |
0.0 |
13107.2 |
26214.2 |
| 18 |
0.0 |
26214.4 |
52428.6 |
| 19 |
0.0 |
52428.8 |
104857.4 |
| 20 |
0.0 |
86400.0 |
191257.4 |
| 21 |
0.0 |
86400.0 |
277657.4 |
It’s not advised to set s3.part.retries too high since making more attempts
after reaching a cap of 24 hours isn’t practical. You can adjust both the
s3.part.retries and s3.retry.backoff.ms connector configuration
properties to achieve the desired retry and backoff characteristics.
AWS Credentials
The following sections provide information about how to configure an S3
connector to provide credentials when connecting to AWS.
Credentials provider chain
By default, the S3 connector looks for S3 credentials in the following locations and in the following order:
The AWS_ACCESS_KEY_ID and AWS_SECRET_ACCESS_KEY environment variables accessible to the Connect worker processes where the connector will be deployed. These variables are recognized by the AWS CLI and all AWS SDKs (except for the AWS SDK for .NET). You use export to set these variables.
export AWS_ACCESS_KEY_ID=<your_access_key_id>
export AWS_SECRET_ACCESS_KEY=<your_secret_access_key>
The AWS_ACCESS_KEY and AWS_SECRET_KEY can be used instead, but are not recognized by the AWS CLI.
The aws.accessKeyId and aws.secretKey Java system properties on the Connect worker processes where the connector will be deployed. However, these variables are only recognized by the AWS SDK for Java and are not recommended.
The ~/.aws/credentials file located in the home directory of the operating system user that runs the Connect worker processes. These credentials are recognized by most AWS SDKs and the AWS CLI. Use the following AWS CLI command to create the credentials file:
You can also manually create the credentials file using a text editor. The file should contain lines in the format shown in the example below. See AWS Credentials File Format for additional details.
[default]
aws_access_key_id = <your_access_key_id>
aws_secret_access_key = <your_secret_access_key>
Note
When creating the credentials file, make sure that the user creating the credentials file is the same user that runs the Connect worker processes and that the credentials file is in this user’s home directory. Otherwise, the S3 connector will not be able to find the credentials.
A query sent to http://169.254.170.2${AWS_CONTAINER_CREDENTIALS_RELATIVE_URI} to return AWS credentials. This is applicable only if the Connect worker processes are running in AWS containers.
A metadata query that returns credentials from an EC2 instance. This is applicable only if the Connect worker processes are running in EC2 instances.
Choose one of the above to define the AWS credentials that the S3 connectors use, verify the credentials implementation is set correctly, and then restart all of the Connect worker processes.
Note
Confluent recommends using either Environment variables or a Credentials file because these are the most straightforward, and they can be checked using the AWS CLI tool before running the connector.
All S3 connectors run in a single Connect worker cluster and use the same credentials. This is sufficient for many use cases. If you want more control, refer to the following section to learn more about controlling and customizing how the S3 connector gets AWS credentials.
Caution
If you configure one of the AWS key and AWS secret key implementations (as
detailed above), credentials can not be supplied through the following
credentials providers or by using the Trusted Account Credentials
implementation. Attempting to provide credentials using multiple
implementations will cause authentication failure.
Credentials providers
A credentials provider is a Java class that implements the com.amazon.auth.AWSCredentialsProvider interface in the AWS Java library and returns AWS credentials from the environment. By default the S3 connector configuration property s3.credentials.provider.class uses the com.amazon.auth.DefaultAWSCredentialsProviderChain class. This class and interface implementation chains together five other credential provider classes.
The com.amazonaws.auth.DefaultAWSCredentialsProviderChain implementation looks for credentials in the following order:
Environment variables using the com.amazonaws.auth.EnvironmentVariableCredentialsProvider class implementation. This implementation uses environment variables AWS_ACCESS_KEY_ID and AWS_SECRET_ACCESS_KEY. Environment variables AWS_ACCESS_KEY and AWS_SECRET_KEY are also supported by this implementation; however, these two variables are only recognized by the AWS SDK for Java and are not recommended.
Java system properties using the com.amazonaws.auth.SystemPropertiesCredentialsProvider class implementation. This implementation uses Java system properties aws.accessKeyId and aws.secretKey.
Credentials file using the com.amazonaws.auth.profile.ProfileCredentialsProvider class implementation. This implementation uses a credentials file located in the path ~/.aws/credentials. This credentials provider can be used by most AWS SDKs and the AWS CLI. Use the following AWS CLI command to create the credentials file:
You can also manually create the credentials file using a text editor. The file should contain lines in the format shown in the example below. See AWS Credentials File Format for additional details.
[default]
aws_access_key_id = <your_access_key_id>
aws_secret_access_key = <your_secret_access_key>
Note
When creating the credentials file, make sure that the user creating the credentials file is the same user that runs the Connect worker processes and that the credentials file is in this user’s home directory. Otherwise, the S3 connector will not be able to find the credentials.
Amazon Elastic Container Service (ECS) container credentials using the com.amazonaws.auth.ContainerCredentialsProvider class implementation. This implementation uses a query sent to http://169.254.170.2${AWS_CONTAINER_CREDENTIALS_RELATIVE_URI} to return AWS credentials for the S3 connector. For this provider to work, the environment variable AWS_CONTAINER_CREDENTIALS_RELATIVE_URI must be set. See IAM Roles for Tasks for additional information about setting up this query.
EC2 instance profile credentials using the com.amazonaws.auth.InstanceProfileCredentialsProvider class implementation. EC2 instance metadata is queried for credentials. See Amazon EC2 metadata service for additional information about instance metadata queries. See Working with AWS credentials for additional information and updates from AWS.
Using Trusted Account Credentials
This connector can assume a role and use credentials from a separate trusted
account. This is a default feature provided with recent versions of this
connector that include an updated version of the AWS SDK.
After you create the trust relationship, an IAM user or an application from the trusted account can
use the AWS Security Token Service (AWS STS)
AssumeRole API operation. This operation provides temporary security credentials that enable
access to AWS resources for the connector. For details, see
Creating a Role to Delegate Permissions to an IAM User.
- Example:
Profile in ~/.aws/credentials:

[default]
role_arn=arn:aws:iam::037803949979:role/kinesis_cross_account_role
source_profile=staging
role_session_name = OPTIONAL_SESSION_NAME

[staging]
aws_access_key_id = <STAGING KEY>
aws_secret_access_key = <STAGING SECRET>
To allow the connector to assume a role with the right permissions, set the
Amazon Resource Name (ARN)
for this role. Additionally, you must choose between source_profile or credential_source
as the way to get credentials that have permission to assume the role, in the environment where the
connector is running.
Note
When setting up trusted account credentials, be aware that the approach of loading profiles from
both ~/.aws/credentials and ~/.aws/config does not work when configuring this connector.
Assumed role settings and credentials must be placed in the ~/.aws/credentials file.
Additionally, the S3 sink connector implements the AwsAssumeRoleCredentialsProvider which means
you can use the following configs to configure the assume role operation.
s3.credentials.provider.class=AwsAssumeRoleCredentialsProvider
sts.role.arn=arn:aws:iam::012345678901:role/my-restricted-role
sts.role.session.name=session-name
sts.role.external.id=external-id
Using Other Implementations
You can use a different credentials provider. To do this, set the s3.credentials.provider.class property to the name of any class that implements the com.amazon.auth.AWSCredentialsProvider interface.
Complete the following steps to use a different credentials provider:
Find or create a Java credentials provider class that implements the com.amazon.auth.AWSCredentialsProvider interface.
Put the class file in a JAR file.
Place the JAR file in the share/java/kafka-connect-s3 directory on all Connect workers.
Restart the Connect workers.
Change the S3 connector property file to use your custom credentials. Add the provider class entry s3.credentials.provider.class=<className> in the S3 connector properties file.
Important
You must use the fully qualified class name in the <className> entry.
Quick Start
In this quick start, we use the S3 connector to export data produced by the Avro
console producer to S3.
Before you begin, create an AWS S3 destination bucket and grant write
access to the user or IAM role completing these procedures. See Setting
Bucket and Object Permissions
for additional information.
Next, start the services with one command using the Confluent CLI
confluent local commands:
Tip
If not already in your PATH, add Confluent’s bin directory by running:
export PATH=<path-to-confluent>/bin:$PATH
Tip
The command syntax for the Confluent CLI development commands changed in 5.3.0.
These commands have been moved to confluent local. For example, the syntax for confluent start is now
confluent local services start. For more information, see confluent local.
confluent local services start
Every service will start in order, printing a message with its status:
Starting Zookeeper
Zookeeper is [UP]
Starting Kafka
Kafka is [UP]
Starting Schema Registry
Schema Registry is [UP]
Starting Kafka REST
Kafka REST is [UP]
Starting Connect
Connect is [UP]
Starting KSQL Server
KSQL Server is [UP]
Starting Control Center
Control Center is [UP]
Note
Make sure the S3 connector has write access to the S3 bucket shown in
s3.bucket.name and can deploy credentials successfully. See
AWS Credentials for detailed information about setting up
credential providers.
To import a few records with a simple schema in Kafka, start the Avro console
producer as follows:
./bin/kafka-avro-console-producer --broker-list localhost:9092 --topic s3_topic \
--property value.schema='{"type":"record","name":"myrecord","fields":[{"name":"f1","type":"string"}]}'
Then, in the console producer, type in:
{"f1": "value1"}
{"f1": "value2"}
{"f1": "value3"}
{"f1": "value4"}
{"f1": "value5"}
{"f1": "value6"}
{"f1": "value7"}
{"f1": "value8"}
{"f1": "value9"}
The nine records entered are published to the Kafka topic s3_topic in Avro
format.
Before starting the connector, make sure that the configurations in
etc/kafka-connect-s3/quickstart-s3.properties are properly set to your
configurations of S3, for example s3.bucket.name points to your bucket,
s3.region directs to your S3 region and flush.size=3 for this example.
Then start the S3 connector by loading its configuration with the following
command:
  confluent local services connect connector load s3-sink

{
  "name": "s3-sink",
  "config": {
    "connector.class": "io.confluent.connect.s3.S3SinkConnector",
    "tasks.max": "1",
    "topics": "s3_topic",
    "s3.region": "us-west-2",
    "s3.bucket.name": "confluent-kafka-connect-s3-testing",
    "s3.part.size": "5242880",
    "flush.size": "3",
    "storage.class": "io.confluent.connect.s3.storage.S3Storage",
    "format.class": "io.confluent.connect.s3.format.avro.AvroFormat",
    "schema.generator.class": "io.confluent.connect.storage.hive.schema.DefaultSchemaGenerator",
    "partitioner.class": "io.confluent.connect.storage.partitioner.DefaultPartitioner",
    "schema.compatibility": "NONE",
    "name": "s3-sink"
  },
  "tasks": []
}
To check that the connector started successfully, view the Connect worker’s log
by running:
confluent local services connect log
Towards the end of the log you should see that the connector starts, logs a few
messages, and then uploads data from Kafka to S3. Once the connector has ingested
some records check that the data is available in S3, for instance by using AWS
CLI:
aws s3api list-objects --bucket "your-bucket-name"
You should see three objects with keys:
topics/s3_topic/partition=0/s3_topic+0+0000000000.avro
topics/s3_topic/partition=0/s3_topic+0+0000000003.avro
topics/s3_topic/partition=0/s3_topic+0+0000000006.avro
Note
The S3 connector doesn’t use the message key. If you need to store the key in
the S3 objects and information in the key doesn’t already exist in the value,
use a custom transformation with
the connector to add the message key to the value.
Each file is encoded as <topic>+<kafkaPartition>+<startOffset>.<format>.
To verify the contents, first copy each file from S3 to your local filesystem,
for instance by running:
aws s3 cp s3://<your-bucket>/topics/s3_topic/partition=0/s3_topic+0+0000000000.avro
and use avro-tools-1.8.2.jar (available in Apache mirrors)
to print the records:
java -jar avro-tools-1.8.2.jar tojson s3_topic+0+0000000000.avro
For the previous file, you should see the following output (with the rest of the
records contained in the other two files):
{"f1":"value1"}
{"f1":"value2"}
{"f1":"value3"}
Finally, stop the Connect worker as well as all the rest of the Confluent
services by running:
Your output should resemble:
Stopping Control Center
Control Center is [DOWN]
Stopping KSQL Server
KSQL Server is [DOWN]
Stopping Connect
Connect is [DOWN]
Stopping Kafka REST
Kafka REST is [DOWN]
Stopping Schema Registry
Schema Registry is [DOWN]
Stopping Kafka
Kafka is [DOWN]
Stopping Zookeeper
Zookeeper is [DOWN]
Or, stop all the services and additionally wipe out any data generated during
this quick start by running:
Your output should resemble:
Stopping Control Center
Control Center is [DOWN]
Stopping KSQL Server
KSQL Server is [DOWN]
Stopping Connect
Connect is [DOWN]
Stopping Kafka REST
Kafka REST is [DOWN]
Stopping Schema Registry
Schema Registry is [DOWN]
Stopping Kafka
Kafka is [DOWN]
Stopping Zookeeper
Zookeeper is [DOWN]
Deleting: /var/folders/ty/rqbqmjv54rg_v10ykmrgd1_80000gp/T/confluent.PkQpsKfE
Example Property File Settings
Refer to the following examples for information about setting up the connector
configuration.
Basic Example
The example settings are contained in
etc/kafka-connect-s3/quickstart-s3.properties as follows:
name=s3-sink
connector.class=io.confluent.connect.s3.S3SinkConnector
tasks.max=1
topics=s3_topic
flush.size=3
The first few settings are common to most connectors. topics specifies the
topics we want to export data from, in this case s3_topic. The property
flush.size specifies the number of records per partition the connector needs
to write before completing a multipart upload to S3.
s3.bucket.name=confluent-kafka-connect-s3-testing
s3.part.size=5242880
The next settings are specific to AWS S3. A mandatory setting is the name of
your S3 bucket to host the exported Kafka records. Other useful settings are
s3.region, which you should set if you use a region other than the default,
and s3.part.size to control the size of each part in the multipart uploads
that will be used to upload a single chunk of Kafka records.
storage.class=io.confluent.connect.s3.storage.S3Storage
format.class=io.confluent.connect.s3.format.avro.AvroFormat
schema.generator.class=io.confluent.connect.storage.hive.schema.DefaultSchemaGenerator
partitioner.class=io.confluent.connect.storage.partitioner.DefaultPartitioner
These class settings are required to specify the storage interface (here S3),
the output file format, currently
io.confluent.connect.s3.format.avro.AvroFormat or
io.confluent.connect.s3.format.json.JsonFormat and the partitioner class
along with its schema generator class. When using a format with no schema
definition, it is sufficient to set the schema generator class to its default
value.
schema.compatibility=NONE
Finally, schema evolution is disabled in this example by setting
schema.compatibility to NONE, as explained above.
For detailed descriptions for all the available configuration options of the S3
connector go to Amazon S3 Sink Connector Configuration Properties.
Write raw message values into S3
It is possible to use the S3 connector to write out the unmodified original
message values into newline-separated files in S3. We accomplish this by telling
Connect to not deserialize any of the messages, and by configuring the S3
connector to store the message values in a binary format in S3.
The first part of our S3 connector is similar to other examples:
name=s3-raw-sink
connector.class=io.confluent.connect.s3.S3SinkConnector
tasks.max=1
topics=s3_topic
flush.size=3
The topics setting specifies the topics we want to export data from, in this
case s3_topic. The property flush.size specifies the number of records
per partition the connector needs to write before completing a multipart upload
to S3.
Next we need to configure the particulars of AWS S3:
s3.bucket.name=confluent-kafka-connect-s3-testing
s3.region=us-west-2
s3.part.size=5242880
s3.compression.type=gzip
The s3.bucket.name is mandatory and names your S3 bucket where the exported
Kafka records should be written. Another useful setting is s3.region that you
should set if you use a region other than the default. And since the S3
connector uses multi-part uploads, you can
use the s3.part.size to control the size of each of these continuous parts
used to upload Kafka records into a single S3 object. The part size affects
throughput and latency, as an S3 object is visible/available only after all
parts are uploaded. The s3.compression.type specifies that we want the S3
connector to compress our S3 objects using GZIP compression, adding the .gz
extension to any files (see below).
So far this example configuration is relatively typical of most S3 connectors.
Now lets define that we should read the raw message values and write them in
binary format:
value.converter=org.apache.kafka.connect.converters.ByteArrayConverter
format.class=io.confluent.connect.s3.format.bytearray.ByteArrayFormat
storage.class=io.confluent.connect.s3.storage.S3Storage
schema.compatibility=NONE
The value.converter setting overrides for our connector the default that is
in the Connect worker configuration, and we use the ByteArrayConverter to
instruct Connect to skip deserializing the message values and instead give the
connector the message values in their raw binary form. We use the
format.class setting to instruct the S3 connector to write these binary
message values as-is into S3 objects. By default the message values written to
the same S3 object will be separated by a newline character sequence, but you
can control this with the format.bytearray.separator setting, and you may
want to consider this if your messages might contain newlines. Also, by default
the files written to S3 will have an extension of .bin (before compression,
if enabled), or you can use the format.bytearray.extension setting to change
the pre-compression filename extension.
Next we need to decide how we want to partition the consumed messages in S3
objects. We have a few options, including the default partitioner that preserves
the same partitions as in Kafka:
partitioner.class=io.confluent.connect.storage.partitioner.DefaultPartitioner
Or, we could instead partition by the timestamp of the Kafka messages:
partitioner.class=io.confluent.connect.storage.partitioner.TimeBasedPartitioner
timestamp.extractor=Record
or the timestamp that the S3 connector processes each message:
partitioner.class=io.confluent.connect.storage.partitioner.TimeBasedPartitioner
timestamp.extractor=Wallclock
Custom partitioners are always an option, too. Just be aware that since the
record value is an opaque binary value, we cannot extract timestamps from fields
using the RecordField option.
The S3 connector configuration outlined above results in newline-delimited
gzipped objects in S3 with .bin.gz.
Using Non-AWS Storage Providers
Many cloud providers implement an AWS S3-compatible API. You can use the
Kafka Connect S3 connector to connect to object storage on their platform.
When configuring the S3 connector for object storage on other cloud providers,
include the following configuration option (if applicable for the cloud
provider):
store.urlThe object storage connection URL.
- Type: string
- Default: null
- Importance: high
Important
Any AWS S3-compatible API you use must support multi-part uploads for the
Kafka Connect S3 connector. See Multipart Upload Overview for
more information.