Service Accounts for Confluent Cloud
You can manage application access to Confluent Cloud by using service accounts.
Permissions are specified using ACLs tied to a specific
service account. ACLs for service accounts are set by an administrator or
another user with a similar role within the organization, and provide important
authorization controls for your enterprise’s Apache Kafka® cluster data.
Service accounts span the entire organization, so they can own API keys for
different resources: dev and prod clusters, and/or Kafka and Schema Registry. A typical use
case has one team administering the Confluent Cloud streaming platform and
issuing service accounts (with ACLs applied) to various application teams that
use the streaming platform. While service accounts cannot log in to the Confluent Cloud
web UI, they can own any type of API keys (which consist
of a key and secret). Because users can leave or change roles within a company,
while applications continue to operate independently, service accounts are especially
useful in organizations that require special identifiers for applications (or
services) not be tied to a specific user.
You create and manage Confluent Cloud service accounts using either the
Confluent Cloud web UI or
the Confluent Cloud CLI. Note that:
When creating service accounts using the CLI
you can optionally create any type of API key and make
the owner a service account.
Note
Kafka ACLs only apply to Kafka and are not supported for other resource
types. Hence, ACLs that exist for a service account are not inherited when
you create a Schema Registry API key from that service account.
When you create service accounts using the Confluent Cloud web UI, you can create
Kafka and Confluent Cloud API keys and make the owner a service account.
You cannot use the Confluent Cloud web UI to create Schema Registry or ksqlDB API keys owned
by a service account.
| API Key Type |
Managed in Confluent Cloud web UI? |
Managed in Confluent Cloud CLI? |
|---|
| Kafka |
Yes |
Yes |
| Schema Registry |
No |
Yes |
| ksqlDB |
Yes |
Yes |
| Confluent Cloud |
Yes |
Yes |
Caution
When you delete a user account or service account, all associated API keys will
also be deleted. Any client applications using a deleted API key will lose access,
which may cause an outage for your streaming application. Always confirm that
none of the API keys owned by an account are in active use before deleting a
user or service account.
Create a service account using the Confluent Cloud web UI
You can use the Confluent Cloud web UI to create service accounts. Note that the workflow
also includes the creation and/or pairing of an API key.
If you want to create a service account without pairing it with an API key, see
ccloud service-account create.
If you want to create an API key and associate it with an existing user account,
refer to Create Kafka API Keys and associate with existing user account.
To create a new service account and API key in the Confluent Cloud web UI:
Navigate to the cluster you want to create the API key for and click the
API access tab, and then click +Add key.
To create an API key that is accessible to specific scoped resources, you must
create a service account to be the owner. Select Create an API key associated
with a new or existing service account, then click Next.
This option enables you to specify which service account controls access to
resources (in this case, the Kafka cluster), and is ideal for production use.
Click Create a new one to create an API key that will be owned by a new
service account. Enter the new service account name and a description, then
click Save and Next.
If you are creating an API key that will be owned by an existing service account,
click Use existing account instead. Select the existing service account and
proceed.
Add ACLs to the service account for clusters, consumer
groups, topics, and transactional IDs.
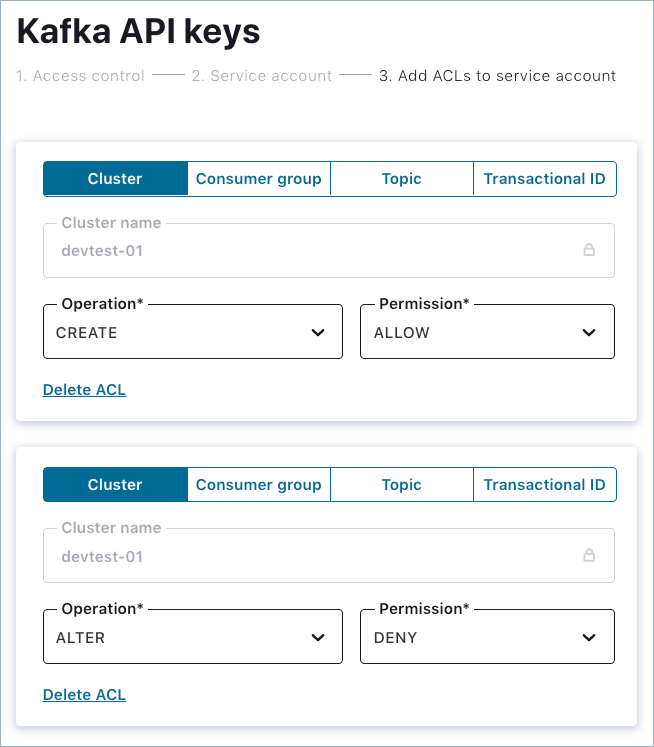
Cluster ACLs
For cluster ACLs, specify the cluster name and select the operation and
corresponding permissions. To add additional operations and permissions,
click +Add ACLs.
Consumer group, Topic, and Transactional ID ACLs
Select the consumer group ID, topic name, or transactional ID to which the
ACL applies. If you want the ACL to apply to a specific pattern type (for
example, LITERAL or PREFIXED), specify a new pattern or select from existing
ones. Specify the operation and its corresponding permissions. To add
additional operations and permissions, click +Add ACLs.
Important
You can specify an ACL for a consumer group, topic, or transactional ID even
if that resource does not yet exist. For example, if you create an ACL for
a consumer group that does not exist, you can subsequently create that
consumer group and configure it to use the ACLs you create here.
Click Save and Next.
The API key and secret are generated for the service account. You will need
this API key and secret to connect to the cluster.
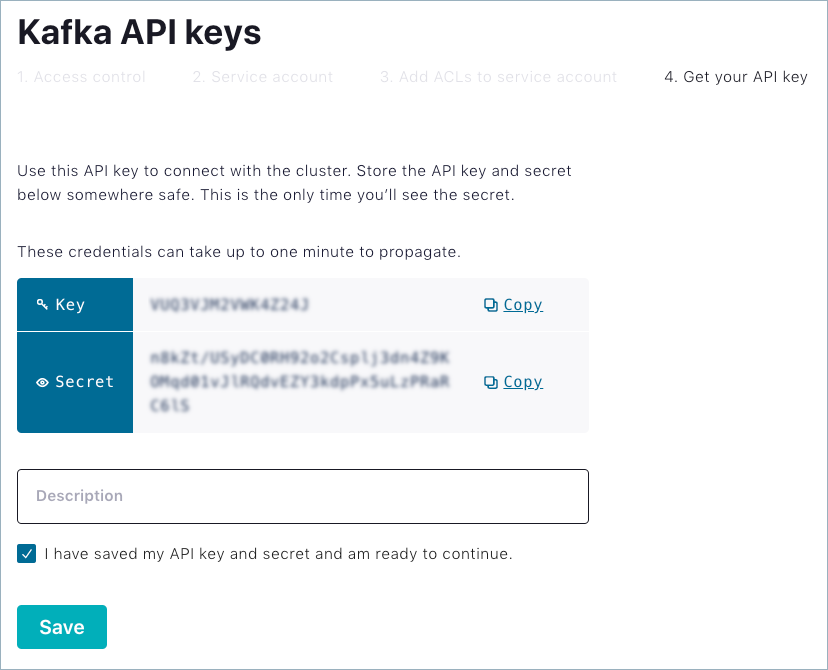
Click Save. The new service account with the API key and associated ACLs
is created. When you return to the API access tab, you can search for the
newly-created API key to confirm.
Create a service account using the ksqlDB web UI
When you create a new ksqlDB application, you can provision a new service
account.
In the navigation bar, click |ksql-cloud|. On the All ksqlDB Applications
page, click Add application.
On the New application page, click Granular access to enable the
Choose service account option.
Click Create a new one and enter the name of the new service account.
Click Add all required ACLs when your ksqlDB app is created. To review
the ACLs that apply to the new application, click View required ACLs.
Click Continue to configure provisioning for the new ksqlDB
application.
Create and manage service accounts using the Confluent Cloud CLI
The following example shows a typical end-to-end workflow that works for Confluent Cloud
running on any cloud provider. Specifically, the example shows how to:
- Create a Kafka cluster and make it active
- Add topics in the cluster
- Set up a service account and ACLs
- Create a Kafka API key and secret
Create a Confluent Cloud Kafka cluster (sales092020):
ccloud kafka cluster create sales092020 --cloud aws --region us-west-2 --type basic
It may take up to 5 minutes for the Kafka cluster to be ready.
+--------------+-----------------------------------------------------------+
| Id           | lkc-abc123                                                |
| Name         | sales092020                                               |
| Type         | BASIC                                                     |
| Ingress      |                                                       100 |
| Egress       |                                                       100 |
| Storage      |                                                      5000 |
| Provider     | aws                                                       |
| Availability | single-zone                                               |
| Region       | us-west-2                                                 |
| Status       | UP                                                        |
| Endpoint     | SASL_SSL://pkc-v8wpn.us-west-2.aws.confluent.cloud:9092   |
| ApiEndpoint  | https://pkac-95yx5.us-west-2.aws.confluent.cloud          |
+--------------+-----------------------------------------------------------+
Note
Make note of your cluster ID. You will need to specify it in subsequent steps.
If at any time you are unsure of the ID, run the ccloud kafka cluster list
command to view all your Kafka clusters and corresponding cluster IDs.
Make the newly-created Kafka cluster the active cluster:
ccloud kafka cluster use lkc-abc123
Set Kafka cluster "lkc-abc123" as the active cluster for environment "env-123ab"
Create topics (raw_pageview_data and analytics_enriched_events) in
the Kafka cluster:
ccloud kafka topic create raw_pageview_data
ccloud kafka topic create analytics_enriched_events
Create a service account named analytics. You must include a
description:
ccloud service-account create analytics --description "My API analytics and secrets service account."
+-------------+---------------------------------------+
| Id          |                                253084 |
| Name        | analytics                             |
| Description | My API analytics and secrets service  |
|             | account.                              |
+-------------+---------------------------------------+
Tip
Name requirements:
- 64-character maximum
- Allowed characters:
- Unicode classes of letter/mark/number
- Special characters:
.,'’&_+|[]/-()
- Whitespace
If you ever lose track of the service account ID, run
ccloud service-account list to retrieve it.
Create a READ ACL for the topic raw_pageview_data.
ccloud kafka acl create --allow --service-account 253084 --operation READ --topic raw_pageview_data
  ServiceAccountId | Permission | Operation | Resource | Name              |  Type
+------------------+------------+-----------+----------+-------------------+---------+
  User:253084      | ALLOW      | READ      | TOPIC    | raw_pageview_data | LITERAL
Optionally, you can create ACLs using the --prefix option, which Kafka
uses to match all resource names that are prefixed with the specified value.
This example shows how to create a READ ACL that applies for all consumer
groups that use the prefix keyreaders:
ccloud kafka acl create --allow --service-account 253084 --operation READ  --prefix --consumer-group keyreaders
  ServiceAccountId | Permission | Operation | Resource |    Name    |   Type
+------------------+------------+-----------+----------+------------+----------+
  User:253084      | ALLOW      | READ      | GROUP    | keyreaders | PREFIXED
Create ACLs for all topics that use a specific prefix. This example
shows how to specify a CREATE ACL for topics with the prefix analytics_.
Running this command creates ACLs that provide CREATE and WRITE
access to any topic whose name starts with analytics_:
ccloud kafka acl create --allow --service-account 253084 --operation CREATE --prefix --topic analytics_
  ServiceAccountId | Permission | Operation | Resource |    Name    |   Type
+------------------+------------+-----------+----------+------------+----------+
  User:253084      | ALLOW      | CREATE    | TOPIC    | analytics_ | PREFIXED
Create a WRITE ACL to a analytics_enriched_events topic with a prefix:
ccloud kafka acl create --allow --service-account 253084 --operation WRITE --prefix --topic analytics_
  ServiceAccountId | Permission | Operation | Resource |    Name    |   Type
+------------------+------------+-----------+----------+------------+----------+
  User:253084      | ALLOW      | WRITE     | TOPIC    | analytics_ | PREFIXED
Create a Kafka API key and secret for service account 253084. Be sure to
replace the service account ID and Kafka cluster ID values shown here with your
own:
ccloud api-key create --service-account 253084 --resource lkc-abc123
It may take a couple of minutes for the API key to be ready.
Save the API key and secret. The secret is not retrievable later.
+---------+------------------------------------------------------------------+
| API Key | 12A3BCDEFGHI4JKL                                                 |
| Secret  | aB+c12dEfghiJkLMNopqr3StUVWxyzabCdEFGHiJ4kL5mnop6QrS78TUVwxyzaB9 |
+---------+------------------------------------------------------------------+
Warning
Save the API key and secret. You require this information to configure your
client applications. Be aware that this is the only time you can access
and view the key and secret.
Optionally, if you are using the Confluent Cloud Metrics API
or Proactive Support and you require
a Confluent Cloud API key:
ccloud api-key create --service-account 253084 --resource cloud
It may take a couple of minutes for the API key to be ready.
Save the API key and secret. The secret is not retrievable later.
+---------+------------------------------------------------------------------+
| API Key | AB1CDEF2GHI3J4KL                                                 |
| Secret  | j3Am6e+loCkCJUQ43iq9Es1z5KO7kKZQGmBvjg7jombv1PR0kxCvjsh6IDrz9LHY |
+---------+------------------------------------------------------------------+
Note that ACLs are not supported against Confluent Cloud API keys.
Important
Client applications that connect to the Confluent Cloud cluster must have at least the
following three parameters configured:
- API key – available when you create the API key/secret pair the first time
- API secret – available when you create the API key/secret pair the first time
bootstrap.servers – set to the Endpoint in the output of ccloud kafka cluster describe
For details about Confluent Cloud CLI service account commands, see the
Confluent Cloud CLI .
Use Confluent Cloud service accounts to produce and consume
After creating a service account, you can use it to control application access
to Confluent Cloud produce and consume topics:
# Log in using the service account API key and secret
ccloud init my-service-account-context --kafka-auth --bootstrap <kafka-cluster-url> --api-key <api-key> --api-secret <secret>
# Produce to topic
ccloud kafka topic produce <topic-service-account-writes-to>
# Consume from topic. -b consumes from beginning of topic.
ccloud kafka topic consume -b <topic-service-account-reads-from>