Overview
Confluent provides Terraform scripts to aid developers working with
Confluent Cloud to automatically provision Confluent Platform tools, such as Schema Registry, REST
Proxy, Kafka Connect, ksqlDB and Control Center. Once provisioned, these tools are connected to the Confluent Cloud cluster.
These scripts handle creating the underlying infrastructure details, like VPC, Subnets, Firewalls, Storage, Compute, Load Balancers,
as well as bootstrapping any processes that are necessary to install and configure the Confluent Platform tools.
Note
These scripts are provided without support and are intended to be a guideline.
Report any issues you encounter via the ccloud-tools GitHub repository, and they will be
addressed on a best-effort basis.
Introduction
Terraform is a tool for developing, changing and versioning infrastructure safely and efficiently using a
Infrastructure-as-Code approach. This enables
you to have an infrastructure that is immutable and potentially reusable across different Cloud vendors. The
ccloud-tools repository leverages Terraform to provide
a superior developer experience for anyone building applications with Confluent Cloud. It allows you to get the
tools from Confluent Platform in a snap and in your chosen Cloud provider, while taking care of the details about
infrastructure provisioning and software bootstrapping.
The following diagram shows an example of what is created by the scripts. Everything related to the infrastructure
is managed by the script, including the VPC, subnets, firewall rules, storage, compute and the load
balancers that expose the tools. The tools are created in private subnets with no internet
access whatsoever. Inbound access is possible only through the public load balancers, which ensures that the
tools are secured within the VPC. The link with the Confluent Cloud cluster is done automatically for you. Finally,
the script also manages the scale-out process through multiple availability zones.
This means that if you want two or more copies of a given tool, like Schema Registry, it is created
across availability zones automatically, ensuring high availability and fault-tolerance within the region
for your tools.
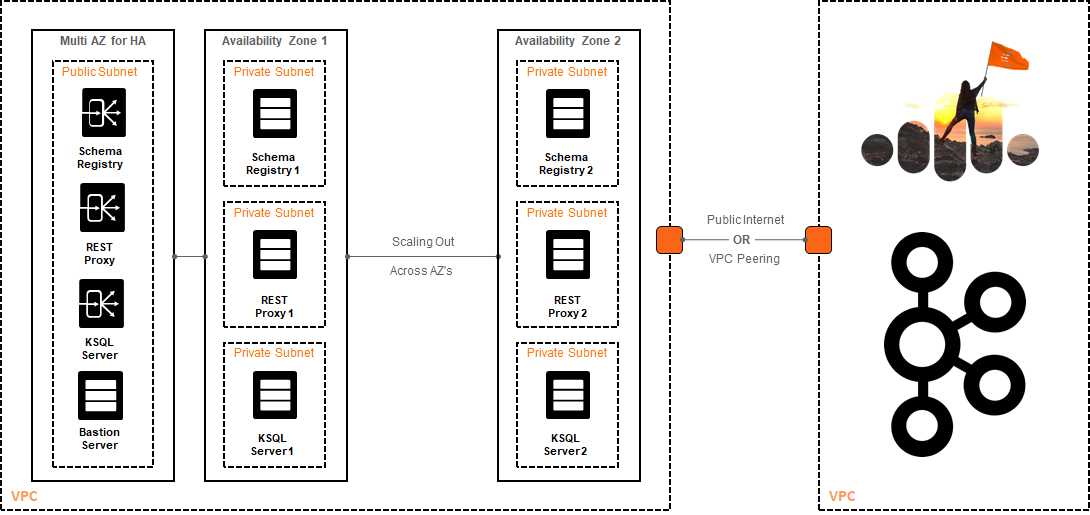
The scripts also provides the ability to provision a bastion server, which might be used to perform local
troubleshooting in the compute instances. Since the compute instances are created within private subnets,
there is no way to access them directly via SSH. The compute instances are created with firewall rules that
give SSH access to the compute instances only from the bastion server. By default,
the bastion server is not created, so you need to enable it explicitly to use it.
Step 2: Get Connectivity Details from your Confluent Cloud Cluster
In this step, you retrieve the connectivity details from your Confluent Cloud cluster.
The actions shown here are usually performed when you want to install the Confluent Cloud CLI and interact with your cluster.
However, you don’t need to perform a full install of the Confluent Cloud CLI. We only need the connectivity details that are
created as part of the process.
From the Clusters page, click your cluster name.
Click Data In/Out in the sidebar and click CLI. Follow the on-screen Confluent Cloud installation instructions,
starting from the section Configure Confluent Cloud CLI. You don’t need to perform any steps from that section,
because you’re not installing the Confluent Cloud CLI. Just click Create Kafka Cluster API key & secret to generate
a new credential key pair.
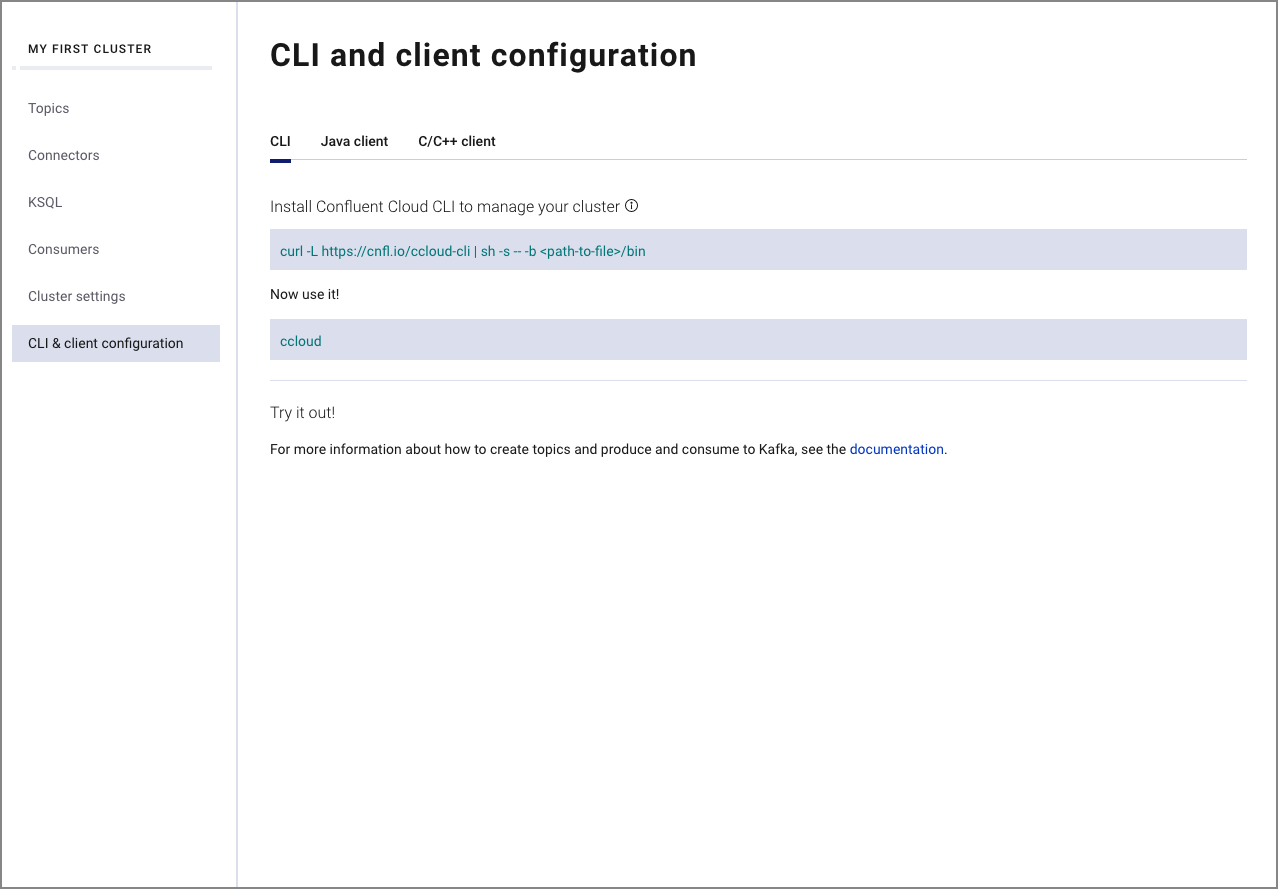
Take note of the information provided by this page, especifically the Bootstrap Broker List, the API Key and API Secret, and keep it in a safe place. You’ll provide this information later, during the Terraform setup.
Step 4: Specify the Confluent Cloud Cluster Connectivity Details
In this step, you configure your Confluent Cloud cluster connectivity details, so that once the tools are provisioned, they can connect to the cluster automatically. The information used here was gathered during Step 2: Get Connectivity Details from your Confluent Cloud Cluster.
Navigate to the /terraform/<provider> directory.
Rename the file ccloud.auto.tfvars.example to ccloud.auto.tfvars
Open the ccloud.auto.tfvars in a text editor to edit its contents.
###########################################
############# Confluent Cloud #############
###########################################

ccloud_broker_list = "<CCLOUD_BROKER_LIST>"
ccloud_access_key = "<CCLOUD_ACCESS_KEY>"
ccloud_secret_key = "<CCLOUD_SECRET_KEY>"
Provide the requested information accordingly and save the changes in the file.
Step 5: Specify the Cloud Provider Credentials Details
In this step, you configure your Cloud credentials, so Terraform can connect to your Cloud provider and perform
infrastructure provisioning. The steps provided here are high-level steps, because each Cloud provider has its own way to
specify credentials.
Navigate to the /terraform/<provider> directory.
Rename the file cloud.auto.tfvars.example to cloud.auto.tfvars
Open the cloud.auto.tfvars in a text editor to edit its contents. The example below shows the information that AWS requires for credentials.
###########################################
################## AWS ####################
###########################################

aws_access_key = "<YOUR_AWS_ACCESS_KEY>"
aws_secret_key = "<YOUR_AWS_SECRET_KEY>"
aws_region = "us-east-1"
Provide the requested information accordingly and save the changes in the file.